
 The following Tutorial helps you create Image Anchors that can detect and augment real-world images in AR. 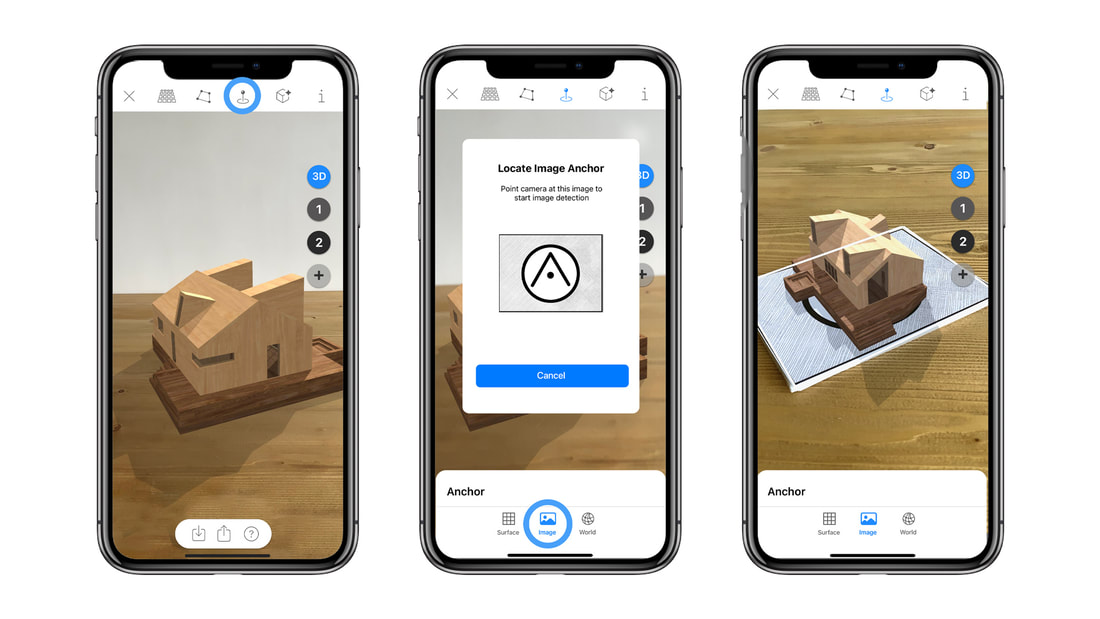 To anchor 3d models to 2d images Import your 3d model into ARki with the predefined Image Anchor as a plane mesh In AR mode select the Anchor -> Image Scan the image to position the 3d model on top! Save 3d models to pre-defined images in the real world. From ARki 7.0 Image anchors can be used to save models accurately in relation to physical images, such as road signs or floor-plans. Image Anchors are created inside your 3d modelling software, and positioned accurately in relation to your 3d model. For best performance: Use good lighting to track the image. Use an image with good contrast. Make sure ARimages are created bigger than 2 metres and less than 100 metres in 3d space. The example FBX files below all work on this image: Please import the FBX files below into ARki, select AR->Anchor->image and point camera at this image to view how Image tracking works.  Setup Image anchors from 3DSMAX3DS Max ARimage Tutorial Steps below: 1.Create A plane Mesh and name it Arimage (make sure the plane is made of 1 polygon, 4 vertex points) *Make sure ARimages are created bigger than 2 metres and less than 100 metres in 3d space. 2.Add texture to the plane to use as an Image Anchor 3.Re-size the plane to match the ratio of the texture - Ensure the plane is greater than 2m in width/height (small planes are currently not supported) 4.Add the 3d model you want to augment in the scene 5.Position the 3d model accurately in relation to the plane mesh 6.Export the FBX, make sure you have Embed media selected. 7.Helpful tip, optimise each texture in the model below 2mb, and 2048 x 2048 pixels Download example file below 3DSMAX Image Anchor and automatic layers3DS Max Arkilayer + ARimage Tutorial Steps below: 1.Create A plane Mesh and name it Arimage (make sure the plane is made of 1 polygon, 4 vertex points) *Make sure ARimages are created bigger than 2 metres and less than 100 metres in 3d space. 2.Add texture to the plane to use as an Image Anchor. 3.Re-size the plane to match the ratio of the texture - Ensure the plane is greater than 2m in width/height (small planes are currently not supported) 4.Add the 3d model you want to augment in the scene 5.Create a dummy and name it Arkilayer01 6.Parent the 3d model to the Arkilayer01 dummy 7.Position the 3d model accurately in relation to the plane mesh 8.If you have multiple layers, repeat the process for every layer 9.Number each dummy in the order you want them to show up in the app. 10. Make sure you have every model parented to a dummy with the correct arkilayer number 11. Export the FBX, make sure you have Embed media selected. 12. Helpful tip, optimise each texture in the model below 2mb, and 2048 x 2048 pixels Download example file below
Setup Image anchors from MayaMaya ARimage Tutorial Steps below: 1.Create A plane Mesh and name it Arimage (make sure the plane is made of 1 polygon, 4 vertex points) *Make sure ARimages are created bigger than 2 metres and less than 100 metres in 3d space. 2.Add texture to the plane to use as an Image Anchor 3.Re-size the plane to match the ratio of the texture - Ensure the plane is greater than 2m in width/height (small planes are currently not supported) 4.Add the 3d model you want to augment in the scene 5.Position the 3d model accurately in relation to the plane mesh 6.Export the FBX, make sure you have Embed media selected 7.Helpful tip, optimise each texture in the model below 2mb, and 2048 x 2048 pixel Download example file below MAYA Image Anchor and automatic layersMaya Tutorial Steps for ARimage and ARkilayer below: 1.Create A plane Mesh and name it Arimage (make sure the plane is made of 1 polygon, 4 vertex points) *Make sure ARimages are created bigger than 2 metres and less than 100 metres in 3d space. 2.Add texture to the plane to use as an Image Anchor 3.Re-size the plane to match the ratio of the texture - Ensure the plane is greater than 2m in width/height (small planes are currently not supported) 4.Add the 3d model you want to augment in the scene 5.Create a Locator and name it Arkilayer01 6.Parent the 3d model to the Arkilayer01 locator 7.Position the 3d model accurately in relation to the plane mesh 8.If you have multiple layers, repeat the process for every layer 9:Number each locator in the order you want them to show up in the app. 10.Make sure you have every model parented to a locator with the correct arkilayer number 11.Export the FBX, make sure you have Embed media selected. 12.Helpful tip, optimise each texture in the model below 2mb, and 2048 x 2048 pixel
Setup Image anchors from RhinoRhino ARimage Tutorial Steps below: 1.Create A plane Mesh and name it Arimage (make sure the plane is made of 1 polygon, 4 vertex points) *Make sure ARimages are created bigger than 2 metres and less than 100 metres in 3d space. 2.Create a layer named Arimage and add the plane mesh inside it 3.Add texture to the plane to use as an Image Anchor 4.Re-size the plane to match the ratio of the texture - Ensure the plane is greater than 2m in width/height (small planes are currently not supported) 5.Add the 3d model you want to augment in the scene 6.Position the 3d model accurately in relation to the plane mesh 7.Export the FBX 8.Helpful tip, optimise each texture in the model below 2mb, and 2048 x 2048 pixel Download example file below Rhino Image Anchor and automatic layersRhino Tutorial Steps for ARimage and ARkilayer below: 1.Create A plane Mesh and name it Arimage (make sure the plane is made of 1 polygon, 4 vertex points) *Make sure ARimages are created bigger than 2 metres and less than 100 metres in 3d space. 2.Create a layer named Arimage and add the plane mesh inside it 3.Add texture to the plane to use as an Image Anchor 4.Re-size the plane to match the ratio of the texture - - Ensure the plane is greater than 2m in width/height (small planes are currently not supported) 5.Add the 3d model you want to augment in the scene 6.Add a layer named Arkilayer01,and add the model inside it 7.Position the 3d model accurately in relation to the plane mesh 8.If you have multiple layers, repeat the process for every layer 9.Number each model and layer in the order you want them to show up in the app 10.Make sure every model has the correct Arkilayer number 11.Export the FBX 12.Helpful tip, optimise each texture in the model below 2mb, and 2048 x 2048 pixel Download example file below
Setup Image anchors from BlenderBlender Tutorial Steps for ARimage below: 1.Create A plane Mesh and name it Arimage (make sure the plane is made of 1 polygon, 4 vertex points) *Make sure ARimages are created bigger than 2 metres and less than 100 metres in 3d space. 2.Add texture to the plane to use as an Image Anchor 3.Re-size the plane to match the ratio of the texture - Ensure the plane is greater than 2m in width/height (small planes are currently not supported) 4.Add the 3d model you want to augment in the scene 5.Position the 3d model accurately in relation to the plane mesh 6.Export the FBX, make sure you set Path mode to copy 7.Helpful tip, optimise each texture in the model below 2mb, and 2048 x 2048 pixels Download example file below Blender Image Anchor and automatic layersBlender Tutorial Steps for ARimage + ARkilayer below: 1.Create A plane Mesh and name it Arimage (make sure the plane is made of 1 polygon, 4 vertex points) *Make sure ARimages are created bigger than 2 metres and less than 100 metres in 3d space. 2.Add texture to the plane to use as an Image Anchor 3.Re-size the plane to match the ratio of the texture - Ensure the plane is greater than 2m in width/height (small planes are currently not supported) 4.Add the 3d model you want to augment in the scene 5.Create an empty and name it Arkilayer01 6.Parent the 3d model to the Arkilayer01 empty 7.Position the 3d model accurately in relation to the plane mesh 8.If you have multiple layers, repeat the process for every layer 9.Number each empty in the order you want them to show up in the app 10.Make sure you have every model parented to an empty with the correct arkilayer number 11.Export the FBX, make sure you set Path mode to copy 12.Helpful tip, optimise each texture in the model below 2mb, and 2048 x 2048 pixels Download example file below
Setup Image anchors from SketchupSketchup Tutorial Steps for ARimage below: 1.Create a plane mesh (make sure the plane is made of 1 polygon, 4 vertex points) *Make sure ARimages are created bigger than 2 metres and less than 100 metres in 3d space. 2.Make the plane into a component 3.Name the component Arimage 4.Name the instance Arimage as well 5.Add texture to the plane to use as an Image Anchor 6.Re-size the plane to match the ratio of the texture - Ensure the plane is greater than 2m in width/height (small planes are currently not supported) 7.Add the 3d model(component) you want to augment in the scene 8.Position the 3d model accurately in relation to the plane mesh 9.Export FBX 10.Helpful tip, optimise each texture in the model below 2mb, and 2048 x 2048 pixel 11.Archive the model and texture into a zip file Download example file below Sketchup Image Anchor and automatic layersSketchup Tutorial Steps for ARimage + ARkilayer below: 1.Create a plane mesh (make sure the plane is made of 1 polygon, 4 vertex points) *Make sure ARimages are created bigger than 2 metres and less than 100 metres in 3d space. 2.Make the plane into a component 3.Name the component Arimage 4.Name the instance Arimage as well 5.Add texture to the plane to use as an Image Anchor 6.Re-size the plane to match the ratio of the texture - Ensure the plane is greater than 2m in width/height (small planes are currently not supported) 7.Add the 3d model(component) you want to augment in the scene 8.Name the component ArkiLayer01 9.Name the instance ArkiLayer01 as well 10.Position the 3d model accurately in relation to the plane mesh 11.If you have multiple layers, repeat the process for every layer 12.Number each Arkilayer component in the order you want them to show up in the app 13.Make sure you have every component with the correct Arkilayer number 14.Export FBX 15.Helpful tip, optimise each texture in the model below 2mb, and 2048 x 2048 pixel 16.Archive the model and texture into a zip file Download example file below
10 Comments
Sebastian B
28/2/2021 04:13:49 pm
Is it also possible to create an image anchor via Archicad, I tried to adapt to the process shown for some of the other applications, but it fails to work
Derek Jackson
14/10/2021 12:34:06 pm
Hi, has there been any progress on the image anchor from ArchiCAD?
We're on ArchiCAD.
Laura
20/12/2021 05:36:27 pm
J
Kyle
21/6/2022 06:31:26 pm
My model is coming in upside-down. It's anchoring to the image fine, but it's upside-down once it's anchored to the image. Suggestions?
Sahar Fikouhi
1/11/2022 02:29:34 pm
Hello please send us a link to your model so we can assess it:
thibault paturle
19/2/2024 12:04:53 pm
Hi, is it possible for the model to be only an image anchor, and not the surface mode as default? Leave a Reply. |
|||||||||||
Want more Information?

|
Our TeamAbout
|
HelpTutorials
|
LegalTerms of Use
|
All works © Darf Design 2020
Please do not reproduce without the expressed written consent of Darf Design
Please do not reproduce without the expressed written consent of Darf Design